I’ve been waiting quite a while to write this article, but now that I’m graduating I feel now is the most appropriate time! This is a more informal article, but I’m going to give a list of tips that would have helped me. I also give these to my friends starting their CS degrees.
Continue reading “Ozzy’s Guide to Earning a Computer Science Degree”
Graph Theory in Roblox (Part 3 – A Solution)
In the previous article, I described a problem I faced when developing a game with little dudes roaming around a pre-built map. In this article, I’ll outline how I applied graph theory (described in the first article) to solve my problem.
Graphs are about relationships between objects. On my map, there are places that I know a minion can be, and I know which of those places can be accessed from nearby places. I placed parts in Roblox Studio on my map to quickly identify such locations:
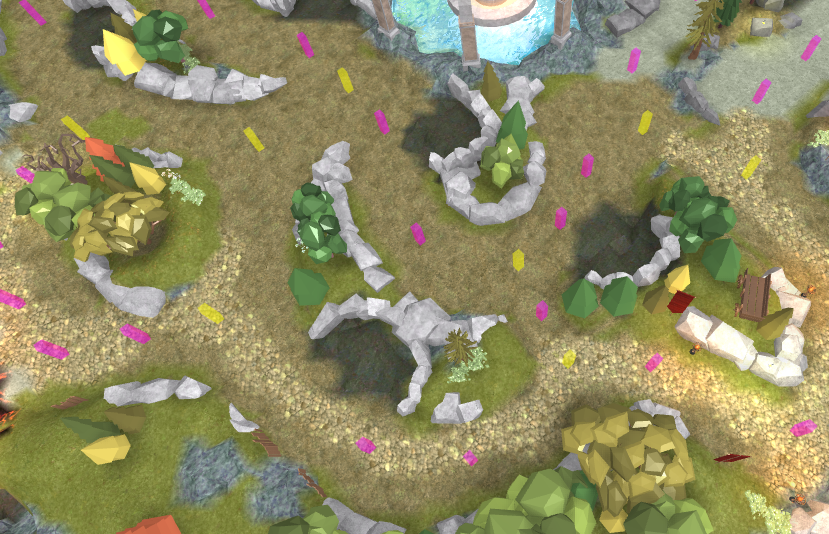
Inside each of these Parts, I added ObjectValues whose Values point to adjacent locations in which a minion should be able to travel between. This is essentially building an adjacency list, where each node contains a list of adjacent nodes. This is one of the two main ways to represent a graph in memory; the other method is to store an adjacency matrix of size n-by-n, where n is the number of nodes in a graph. However, I am working with a sparse graph, which means the 100+ nodes only connect to a select few (2-6) other nodes near to them.
Now I have a representation of my map’s network of navigable areas. At runtime, I have the game convert my Parts and ObjectValues into nodes and edges in a graph. The weights of the edges are the euclidean distance between the nodes. If you’d like to view my implementation of graph, node and edge objects, you can download an rbxmx file here. If you’d like to view the source code of each script individually, here are some pastebin links:
The algorithm I selected for shortest path calculation is the Floyd-Warshall algorithm. For my fellow CS nerds, it runs in order n-cubed time (for every n nodes, we perform n×n×n steps). This algorithm finds all possible paths between all nodes and leaves each node a list of nodes one should travel to if they are to reach a specific destination node. In other words, imagine an n-by-n table, on the left is your current node, on the top is your destination node. It fills out the table with an adjacent node one ought to which one should travel.
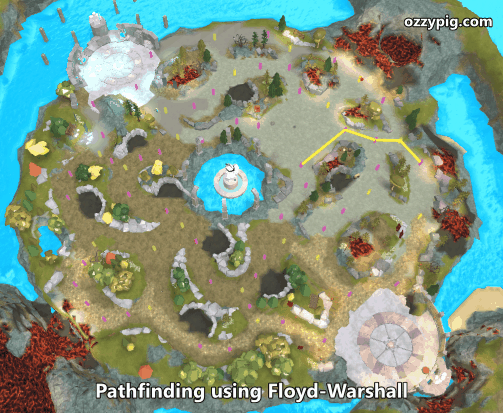
Above is an animation of randomly chosen paths being rendered in sequence. Here is my implementation (also included in the rbxmx file above) as a mix-in for the Graph class:
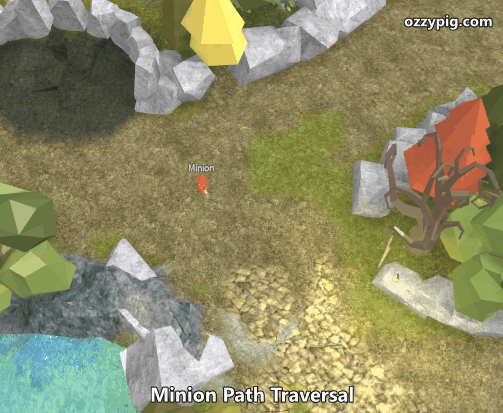
The result is pretty awesome! Now, all I do is spawn minions at a random node and randomly choose another random node to path towards. And finally here’s a preview of the two minions using the generated paths.
Got questions or comments? Drop me a direct message on Twitter or a message on Roblox.com! I’d love to update this article series with more information.
Graph Theory in Roblox (Part 2 – A Problem)
In the previous article, I went over basic graph theory terms and concepts. Click here to read that article. In this one, I’m going to describe a game design problem I found while working on my project.
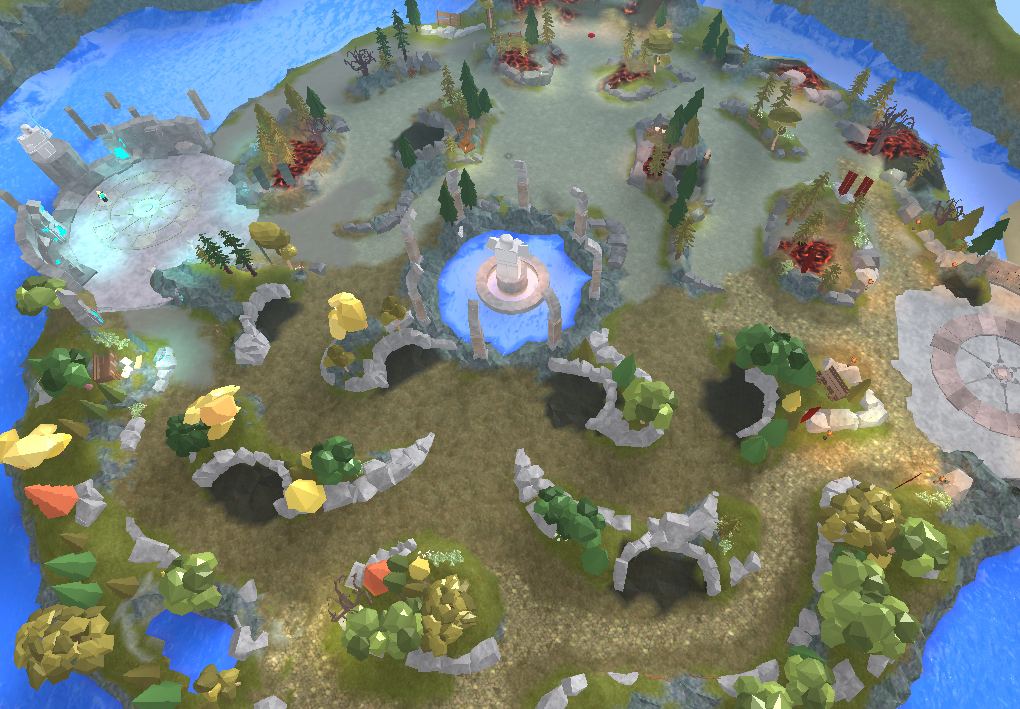
First, some background information on my project. Without going into too much detail, it involves two teams roaming a map killing neutral monsters as an objective. One of these neutral monsters I’m calling creeps or minions, similar to those in Defense of the Ancients 2 and League of Legends. In those games, minions align with a team and march down set paths and assault enemy structures on those paths. However, in my game, minions aren’t on a team, don’t attack structures, and have no set path. Here’s an early draft of the map I’m using:
Minions roam this map freely, and one challenge I’m facing is programming the minion roaming behavior. I came up with a number of ideas immediately. Here’s some of them:
- Just walk in some random navigable direction, changing direction if they run into a wall
- Create a bunch of paths and pick one to follow
- Pick a random target on the map and use Roblox’s pathfinding to do the hard work for me in finding a path to the point
Well, there’s going to be a lot of minions around this map. Maybe they’ll even travel in packs, who knows! I can’t have the minions raycasting for walls, and I can’t use expensive pathfinding for them to navigate. I also don’t want them switching directions a lot; I’d rather they travel a long path instead of small segments.
How did I apply graph theory to this problem? Find out in the next article.
Graph Theory in Roblox (Part 1 – Intro)
Hey, everyone. Some of you might not know this, but I’m a big nerd when it comes to the topic of computer science. Coding, functions, runtime analysis, space complexity, algorithms… you name a CS topic, I’m probably interested in it. In this series of articles I’m going to outline how I used graph theory, a fundamental topic of computer science, in developing a feature for my current project.
In this article series, I want to give a surface-level introduction to graph theory and showcase the solution to a problem from one of my projects
First and foremost, let’s talk about what graph theory is by defining some of the terms. A graph is a set of vertices (aka nodes), which have edges (aka arcs) connecting them. Two vertices are adjacent if they share an edge. An undirected graph is one in which edges have no direction (edges are lines), and the edges in a directed graph have a direction (edges are arrows). A weighted graph assigns a value to edges
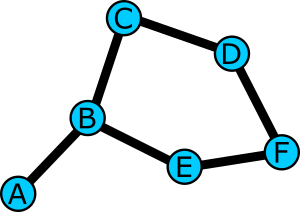
Pictured above is a representation of an unweighted, undirected graph featuring nodes labelled A through F. This graph could represent many real-world ideas:
- A physical map of cities connected by highways
- A social network of people connected by friendships
- A set of game board states connected by moves you have to make to get from one state to another
- A final boss’ attack pattern (nodes are unique attack states, edges are transitions)
Notice how not all of these examples are physical things! They are instead collections of things and relationships between those things. I hope you can start to imagine the many different applications of graphs to real-world problems. Many algorithms have been dreamed up to solve problems involving graphs. To name just a few:
- Breadth-first (BFS) and depth-first search (DFS) – Two methods of visiting all the nodes in a graph but in different orders
- Dijkstra’s algorithm – For weighted graphs, find the lowest cost path between two nodes (you cannot use negative edge weights).
- The Bellman-Ford algorithm – Similar to Dijkstra’s and slower, except you can use negative edge weights (however, there must not be any negative cycles in the graph – a cycle of edges that sum to a negative number)
- The Floyd-Warshall algorithm – For weighted graphs, calculate all of the paths from each node to every other node.
- Prim’s algorithm – For weighted graphs, find a minimum spanning tree that visits all nodes, and picks edges so that all nodes are part of the complete graph, while also minimizing costs of used edges.
In the next article, I’ll describe a problem that I identified while working on my project. Later, I show how one of these solve my problem. Click here for part 2 of this series.
Event Systems in Roblox Lua (Part 4 – Full Solution)
Click here for part 3 of this tutorial series, where we used a BindableEvent to take all the work out of creating our own event system. Ok, maybe not all the work, but still…The limitations are real with BindableEvents. Namely the arguments from firing them can’t include special tables, and that’s a problem when we’re working with our custom objects with metatables. Let’s fix it with a little bit of Lua magic.
First off, we need to save the original values when the event is fired. We don’t know what variables are sent to the fire method, but we are able to save them with a table using the … operator. If you want to know the nitty-gritty, definitely read section 5.2 on variable arguments in Programming in Lua. Let’s add an argument table and an argument count fields in the event itself:
function Event.new()
	local self = setmetatable({
		bindableEvent = Instance.new("BindableEvent");
		argData = nil;
		argCount = nil;
	}, Event)
	return self
end
Note that we don’t have to add these here, by the way. Initializing them to nil does do anything except let us, the programmers, know that these are accessible fields that we’ll use in the future. It’s good practice, so you should get in the habit of showing these fields here.
Next, let’s save the arguments and argument count in these fields by revisiting our fire function:
function Event:fire(...)
	self.argData = {...}
	self.argCount = select("#", ...)
	self.bindableEvent:Fire()
end
Notice how we use … within a table to capture the values into argData . We can now use this table to inspect the possibly many arguments passed. Also, an important detail is the use of the select function: if you give “#” as the first argument, it returns the number of arguments passed after it. We just use … again here to do that. Finally, we aren’t even sending anything to the BindableEvent anymore since we’re handling that ourselves. It’s best to remove it for efficiency’s sake.
Okay, now we have all the information saved! How do we use it? We have to get a bit creative with our connect function. Instead of connecting the function directly to the BindableEvent’s Event, we need to connect our own anonymous function. Inside, we’ll unpack the arguments we saved while firing the event, and use that to call our function.
function Event:connect(func)
	if not func then error("connect(nil)", 2) end
	return self.bindableEvent.Event:connect(function ()
		func(unpack(self.argData, 1, self.argCount))
	end)
end
We use unpack here in order to return each of the saved arguments from 1 to the number we saved. I’ll save the detailed explanation of unpack for section 5.1 in Programming in Lua. Just know that it’s like returning multiple values from a function, except for unpack it’s the multiple values are all the indices of the table we give it.
And that should solve our problems with the BindableEvent! We get all the nice threading that Roblox provides internally while working around the table limitations by saving and unpacking them ourselves. Try out the final product with the test code from part 3 and you’ll see the improvement.
And there you have it – just a few ways you can create and use your own custom events within your Lua code on Roblox. You can download the final Event class code here. I had to whittle down my examples to just these 3, so if there’s interest I’ll post others. If you have questions, send me a direct message on Twitter or a message on Roblox. Thanks!
Event Systems in Roblox Lua (Part 3 – Better Solution)
Click here for part 2 of this tutorial series. In part 2, we created a simple solution to our problem of creating an event system. We saw there are some problems with this, namely the synchronous execution. One after another, our connected functions are called when the event is fired.
Often times, when you’re using a game engine it’s best to let the engine do the heavy lifting for you. Roblox provides the BindableEvent object to create events in (or out of) the game hierarchy, however it isn’t often that you’ll want to instantiate one every time you want to create a custom event. Let’s create an Event class which uses BindableEvent internally intstead. Let’s re-start with the boilerplate from part 2:
-- A new Event class that uses BindableEvent internally
local Event = {}
Event.__index = Event

function Event.new()
	local self = setmetatable({
		bindableEvent = Instance.new("BindableEvent");
	}, Event)
	return Event
end
We’re no longer keeping track of the connections ourselves with a table. We’ll merely be passing the connect and fire behaviors onto the already existing functionality of the object. This is quite simple, actually:
function Event:connect(func)
	return self.bindableEvent.Event:connect(func)
end

function Event:fire(...)
	self.bindableEvent:Fire(...)
end
The key benefit here: since we’re delegating the responsibility of calling the connected functions to the BindableEvent, it can handle the threading as well. Connected functions that yield will not block other connected functions, so this is a primary benefit from the first simple solution. Note the use of … to represent “any and all variables passed to this function”. We’ll talk more about it in part 4.
There is still a problem with this, though. BindableEvents were originally created for inter-script communication. When it comes to tables, there’s some “gotchas”
Avoid passing a mixed table (some values indexed by number and others by key), as only the data indexed by number will be passed.
BindableEvent documentation
This is a big drawback to using a BindableEvent. Your tables will not be the same table as the one you fired the event with. Here’s an example demonstrating this drawback:
local event = Event.new()
local my_table = {}

local function onEvent(other_table)
	error(other_table == my_table, "Fail whale!")
end

event:connect(onEvent)
event:fire(my_table)
You can see that we are firing the event with my_table , then in the connected function comparing that table to (supposedly) itself. This shouldn’t ever throw an error, but it always does due to the described limitations of the BindableEvent.
You’ll also lose metatables, too! So if you created an object using our object-oriented tricks from the previous tutorial, you won’t have an object anymore. Just an empty shell of a table, no purpose, no meaning in life… definitely something you want to avoid.
You can see that the key benefit of letting Roblox handle the threading with the cost of the BindableEvent’s limitations is definitely a trade-off. You can download the finished version of this Event class here. Is it possible to work around this limitation? Maybe. Click here to find out in part 4.
Event Systems in Roblox Lua (Part 2 – Simple Solution)
Click here for part 1 of this tutorial series. You should be familiar with the content discussed in my Object-Oriented Programming tutorial.
In part 1, I discussed the pattern of an event system and the need for it in Roblox code. We frequently find ourselves needing to define our own gameplay defined events. Let’s dive into a simple way we can implement this pattern. Let’s use the OOP tricks we know in Lua to create the shell of an Event class.
-- A shell of an event class
local Event = {}
Event.__index = Event

function Event.new()
	local self = setmetatable({
		-- We'll put any variables (fields) we need here
	}, Event)
	return Event
end

function Event:connect(func)
	-- Somehow keep track of the functions connected here
	-- Provide a means to disconnect this function from this event
end

function Event:fire(...)
	-- Call all the functions somehow
end
So, at surface level we need a way to store some number of functions. We should be able to add/remove those functions. Crazy idea: let’s just use a numerically-indexed table of functions. We’ll use table.insert to connect a function, and to disconnect we’ll iterate over each index and remove the first we find that matches. When we fire the event, just iterate over the list of functions, calling them in order. Let’s code it up.
First, let’s add a connections table to our event. This will be our table of functions.
function Event.new()
	local self = setmetatable({
		connections = {};
	}, Event)
	return self
end
Next, let’s write the fire function. Simple iteration using a numeric for-loop:
function Event:fire(...)
	for i = 1, #self.connections do
		self.connections[i](...)
	end
end
That oughta do it! Finally, let’s write the connect function.
function Event:connect(func)
	if not func then error("connect(nil)", 2) end
	table.insert(self.connections, func)
end
Notice how I added a line that will throw an error if we sent no function to connect. Finally, we need to add a means to disconnect. Let’s return a table with a disconnect function as a key:
function Event:connect(func)
	if not func then error("connect(nil)", 2) end
	table.insert(self.connections, func)

	local function disconnectFunc()
		for i = 1, #self.connections do
			if self.connections[i] == func then
				table.remove(self.connections, i)
				break
			end
		end
	end
	return {disconnect = disconnectFunc}
end
And there we have it! We’ll soon find out that there are some issues with this. For simple uses cases, this works fine. However, if any connected functions yield (yielding essentially means waiting, like announceGameOver does to display the message), the next connected function will not run until the yielding function completes. This is a problem in the part 1 example because we might want our map to clean up first, then the game to announce the final score. It depends on the order in which we connected our events.
This event system calls connected functions in the order they were connected. In other words, first-in-first-out (FIFO). We could reverse this order (last-in-first-out, LIFO) by iterating backwards in the fire function:
function Event:fire(...)
	for i = #self.connections, 1, -1 do
		self.connections[i](...)
	end
end
Alternatively, we could just insert new functions at the beginning of the list in connect by specifying index 1 as the insertion point in the table.insert call:
table.insert(self.connections, 1, func)This is actually less efficient as Lua must move all the existing functions in the table over by 1 to make room for the one we’re inserting. For the computer science nerds in the audience, this is an O(n) operation. Simply inserting to the end of the list would be O(1). It goes without saying that making both of these changes (reverse iteration and insertion at the front of the list) would cancel each other out and we’d be back to original behavior of FIFO.
If this solves your problem, then I have good news: you can stop here. As for the rest of us, we have more options to explore in part 3. You can download the finished version of this Event class here.
Event Systems in Roblox Lua (Part 1 – The Problem)
Hey everyone. Lately I’ve been considering the many ways to create event systems for Roblox Lua. You may already be familiar with native events, a.k.a. RBXScriptSignal, in Roblox. You connect your function to one of these, and when the engine detects the occurrence, it calls your function with the relevant arguments. BasePart.Touched is one of the most common examples.
But what if you’re making your own objects, like in my object-oriented programming tutorial? If your custom objects want to define events, you have a ton of different options for implementing this pattern. In this tutorial series, I will explore the different methods you can use to implement an event-listener pattern.
Before we look at the different ways we could create a system like this, let’s define exactly what we’re trying to code up. We want to be able to create an event and connect any number of functions to it. In addition, we want to send arguments to the connected functions when this event is fired. Finally, we need to be able to disconnect a connected function from this event. So, no matter what systems we end up making, we should be able to do something like this (for example, in a round-based game):
local function announceGameOver(finalScore)
	print("Game over!")
	local message = Instance.new("Message")
	message.Text = "Game over! Your score: " .. finalScore
	message.Parent = workspace
	wait(2)
	message:Destroy()
end

local function cleanUpTheGame()
	-- Destroy the map if we have one
	if workspace:FindFirstChild("Map") then
		workspace.Map:Destroy()
	end
	-- Clean up any debris on the ground
	while workspace:FindFirstChild("Debris") do
		workspace.Debris:Destroy()
	end
end

local onGameOver = Event.new()
onGameOver:connect(announceGameOver)
onGameOver:connect(cleanUpTheGame)

-- ...somewhere else in your code...
onGameOver:fire(69)
A couple things to note:
- It ought not matter in which order our functions
announceGameOverandcleanUpTheGamewill run; in a perfect world we’d have them happen at the same time. (In reality, one will always happen before the other and it’s the order in which we connect these functions that may ultimately play a part in what order they are actually called.) - Not all connected functions will need to use all the arguments sent by the event, such as
cleanUpTheGamenot needing the final score we sent. - Not all connected functions will need to stay connected – we might need to disconnect functions as a cleanup measure.
- For brevity, I will be skipping over writing a wait method to yield until an event is fired.
With those things in mind, let’s see the different ways we can make event systems in Roblox Lua!
Object Oriented Programming in Lua (Part 4 – Clean-up)
This final part of this tutorial series will talk about some ways to clean up the example from the previous part and apply it to Roblox. First thing’s first: let’s move the entire Car class defintion into its own ModuleScript called “Car” inside ServerScriptService. Now we can combine the CarMetatable and CarMethods into a single table. Just have __index refer to the table itself. Let’s call the table Car.
local Car = {}
Car.__index = Car
Next, we can package the newCar constructor into this table. Remember that setmetatable(t, mt) returns the table t whose metatable we are setting in the function call. The constructor can be simplified to just this:
-- Old constructor
function newCar(color)
	local car = {}
	car.color = color
	car.speed = 0
	setmetatable(car, CarMetatable)
	return car
end

-- Brand-new simplified constructor
function Car.new(color)
	return setmetatable({
		color = color;
		speed = 0;
	}, Car)
end
Notice that we are creating the new object table inside the setmetatable function, which will both set the metatable and then return it from the constructor. Finally, we fix the method definitions as well.
-- Such honk, much beep, wow.
function Car:honk(self)
	print("Beep beep!")
end

-- Vroom vroom, what a clean looking method!
function Car:accelerate()
	self.speed = self.speed + 20
end
Since this is inside a ModuleScript, return the Car table on the final line.
return CarSince we are creating objects, we can make many of them at once with all unique identities, states and methods. Here’s an expansion of the previous part’s examples. This should go in a script somewhere inside your game.
local Car = require(game.ServerScriptService.Car)

local ferrari = Car.new("red")
local bugatti = Car.new("blue")

ferrari:honk()
bugatti:honk()

ferrari:accelerate()
bugatti:accelerate()
bugatti:accelerate()

print("My Ferrari is going " .. ferrari.speed .. " miles per hour")
print("My Bugatti is going " .. bugatti.speed .. " miles per hour")
And that’s it! You should download the code for the Car class and example script. Play around with creating your own classes. It’s a lot of fun and you’ll find object oriented programming is a fantastic way to make your code more organized. If you have questions, send me a direct message on Twitter or a message on Roblox.
Object Oriented Programming in Lua (Part 3 – Examples)
In this section, we will apply the information from the last two sections into an actual example. Let’s implement a Car class in which we will make Car objects. Cars have a state (like their color or speed) as well as behavior like accelerating or honking the horn. We will create fields and methods for both of these.
We start by defining a car metatable and a table of car methods. We set the __index metamethod so when a new car object is given this metatable, we can access our methods through it.
-- The metatable for future car objects
local CarMetatable = {}
-- The table of car methods (functions)
local CarMethods = {}
-- Set the __index metamethod of the metatable
-- so that we can access the car methods through
-- car objects.
CarMetatable.__index = CarMethods
Next, we write a function to create a new car of a certain color and set the metatable properly. Additionally, we can initialize the speed field to zero. A function like this is called a constructor.
function newCar(color)
	local car = {}
	car.color = color
	car.speed = 0
	setmetatable(car, CarMetatable)
	return car
end
Excellent, now write some methods for the car, like acceleration and honking the horn. Store these in the CarMethods table. Remember that we’re going to call these methods with colon syntax, so the first argument is going to be the car we’re working with. Let’s call this first parameter self .
CarMethods.honk = function (self)
	print("Beep beep!")
end
An important thing to mention here is that the following function definitions are all equivalent:
-- A good way to define a method
CarMethods.accelerate = function (self)
	self.speed = self.speed + 20
end


-- A better way to define a method
function CarMethods.accelerate(self)
	self.speed = self.speed + 20
end

-- The cleanest way to define a method
function CarMethods:accelerate()
	self.speed = self.speed + 20
end
For the last one, we are defining the function with a colon! This tells Lua that we’re going to implicitly create a local variable called self which refers to the first argument to the function. Conveniently, when we call the method with the colon syntax, self is automatically filled with the car in question.
And this is all we need to have something workable. Create a new car with the newCar function and use some of its methods (don’t forget to use a colon instead of a period)!
local ferrari = newCar("red")
ferrari:honk()
ferrari:accelerate()
print("My Ferrari is going " .. ferrari.speed .. " miles per hour")
In the next article, we’ll talk about ways to clean up this code more.